CONNECT WITH US FOR MORE CAD TIPS AND TRICKS. ★★★★★★★★★★★★★★★★★★★★★★★ ♣ My Website: http://freecadtipsandtricks.com/ ♥ Subscribe Here: https://www.youtube.com/user/jamiltay... ♠ FaceBook: https://www.facebook.com/freecadtipsa... ★ Fiverr: https://www.fiverr.com/jamiltayyab ★★★★★★★★★★★★★★★★★★★★★★ --------------( Don't Forget to thumbs Up )-------------------- ----------( Don't Forget to Subscribe for More )--------------- --~-- Autodesk AuotCAD Civil 3D - Create Pipes and Road Crossing Ducts Civil 3D - Part 1 draw underground ductbanks using civil 3D Create Pipes and Road Crossing Ducts in Civil 3D-Part 1. This videos shows how to create simple list of spare pipes/ducts for future use under the paved roads, in autocad civil 3d. Please don't forget to subscribe. PLEASE DON'T FORGET TO SUBSCRIBE, LIKE AND COMMENT. THANKS FOR WATCHING. Please visit my other videos also List of Tutorials in Playlist: How to Export AutoCAD Coordinates for Polyline and Points to MS Excel https://www.youtube.com/watch?v=iF93D... How to make isometric drawing in AutoCAD, How to switch to 2d isometric view https://www.youtube.com/watch?v=r3M56... Autocad Best Commands And Techniques Best Autocad Tricks Part 1 https://www.youtube.com/watch?v=iKbrw... Autocad Best Commands And Techniques Best Autocad Tricks - Part 2 https://www.youtube.com/watch?v=cCvxW... AutoCAD- How to Make A Custom Linetype in AutoCAD https://www.youtube.com/watch?v=ewbPR... Earthwork Crossection Of Formation Level Of A Road In AutoCad https://www.youtube.com/watch?v=U2hx6... Autodesk Civil 3D Road Profile and Drawing Settings - Simple Road Profile https://www.youtube.com/watch?v=vhlh0... Manual Earthwork Cross Sections and Calculations by Average End Area Method in AutoCAD https://www.youtube.com/watch?v=0f2--... Microstation Trick for Printing by Using Print Organizer, Batch Print. https://www.youtube.com/watch?v=3ZTyj... AutoCAD - How To Add Custom Paper Size To A Printer https://www.youtube.com/watch?v=OmTtu... Create Pipes and Road Crossing Ducts Civil 3D-Part 1 https://www.youtube.com/watch?v=r6iC8... Create Pipes and Road Crossing Ducts Civil 3D-Part 2 https://www.youtube.com/watch?v=oVgBo... Auto CAD Drawing Printing to JPG, JPEG or PNG High Res Picture https://www.youtube.com/watch?v=NnTak... Civil 3D Tutorial - Road Profile Creation in Civil 3D by AutoCAD elements. https://www.youtube.com/watch?v=Vbjux... AutoCAD- How to Make A Custom Linetype in AutoCAD https://www.youtube.com/watch?v=OmTtu... AutoCAD Civil 3D Tutorial - DUCT LIST AND LIST OF PIPE NETWORKS https://www.youtube.com/watch?v=qsdIr... Layout in AutoCad 2007 https://www.youtube.com/watch?v=YkjXP... Tags: Road Crossing Ducts, Road Crossing Pipes, civil 3d duct, future ducts, road ducts, civil 3d part builder, Civil 3D, road pipes, autocad civil 3d, civl 3d pipe networks, pipe networks, pipes, part builder civil 3d, autodesk civil 3d, Pipe, mastering autocad civil 3d 2016, civil 3d tutorial, civil 3d, piping design, piping system, autocad civil 3d training, autocad civil 3d tutorial, pipe styles, pipe networks, civil 3d 2016, autocad civil, Duct, autocad, civil, autocad 2007,
Creating the Electrical Duct Bank.
1. Create the electrical duct bank Alignment(s).
2. Create Profile(s) from the alignment. Select the necessary surfaces. Existing and finished grades surfaces.
3. Create the Profile View(s).
4. Select the Profile View then create two separate top and bottom duct bank profiles using the Profile Creation Tool.
5. Create an electrical duct bank Assembly for the bottom and sides. The assembly in this exercise is 3'x2.5'
a. Use the Generic Link Width and Slope sub-assembly for the left and right bottom and sides.
b. Set the left and right side wall sub-assemblies to a width of 0.01 and slope of 25000.00% to create the 2.5' tall duct bank.
6. Create a duct bank Assembly for the top. The top is 3.02' wide due to the left and right side wall sub-assemblies slopes.
a. Use the Generic Link Width and Slope sub-assembly for the left and right top.
7. Create a corridor for the electrical duct bank bottom and sides.
a. Select the duct bank alignment.
b. Select the duct bank bottom profile.
c. Select the duct bank bottom assembly.
8. Create a second corridor for the electrical duct bank top.
a. Select the duct bank alignment.
b. Select the duct bank top profile.
c. Select the duct bank top assembly.
9. Adjust both top and bottom corridor frequency as needed. I set it to 5.00'.
10. Create TIN surfaces from the top and bottom corridors.
11. Create surface boundaries for each surface. Use Corridor extents as outer boundaries.
Creating Electrical Duct Bank Manhole Structures
1. Create a Pipe Network, call it DUCTBANK.
2. Select the 48"x48" Rectangular Junction Structure. (Change structure size as needed.)
3. Delete the pipes as I'm only utilizing the structures from the network.
4. Adjust the structure height as needed per specification. (Use Rim to Sump.)
5. Draw/Add the structures parts to the electrical duct bank profile. (Label as needed.)
Notes:
- Other Assembly options are to create custom duct bank sub-assemblies.
- Data Shortcuts can be created of all objects for use in other drawings and profiles.
- The objects can also be exported to other software such as InfraWorks, 3D Studio Max and Navisworks.
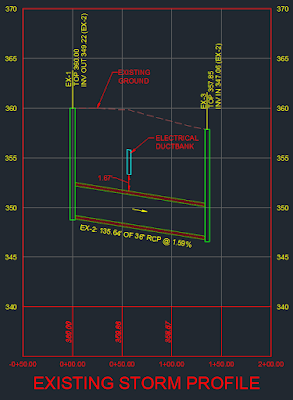
The electrical duct bank surfaces referenced in a storm sewer profile.
Tip: Be sure to properly name all the Civil 3D objects.
Tags:
CAD


